WolfVision’s Cynap is a bring-your-own-device system that allows you to share your class materials from a variety of sources. This enables you to quickly switch from showing your laptop, document camera, BluRay player, smartphone, onboard web browser, and more to students in your classroom.
WolfVision Cynap Simulation
Select this image or link to view an interactive Cynap simulation and walk-thru. This will leave the classrooms.utk.edu site and go to another OIT site.

Learn How to Use Cynap
Choose between written or video-based instructions on connecting to the Cynap and using interactive features like the web browser, whiteboard, and annotation.
Connect to Cynap Using a Wired Connection (HDMI, USB-C, Document Camera)
- Connecting a Laptop Wired (HDMI or USB-C) instructions with images on connecting a pluggin-in laptop to Cynap.
- Connecting a Document Camera– instructions on connecting a document camera to Cynap.
Connect to Cynap Wirelessly Using Wi-Fi
- Connecting a Laptop Wirelessly – instructions with screenshots for connecting a Mac laptop and then a Windows laptop to Cynap.
Connecting a PC Wirelessly with Cynap
Note: the video to the left is a supplement to these instructions.
- Make sure the control panel is set up and the Cynap screen is displayed on the projector.
- On your keyboard, press the Windows key + K at the same time.
- A menu will open with screen projection options.
- On Windows 10, select “Connect to a wireless display” at the bottom of the menu.
- On Windows 10 or Windows 11, choose your Cynap classroom from the list of available devices.
- If prompted, enter the PIN code shown at the top of the Cynap screen.
- Your device screen will now appear on the Cynap display.
Connecting a Mac Wirelessly with Cynap
Note: the video to the left is a supplement to these instructions.
- After turning on Cynap, select the Control Center icon on your Menu Bar.
- In the Control Center, select the Screen Mirroring icon.
- Select the Cynap for your room.
- Enter the PIN code for the Cynap in your room.
- A four-digit code will appear at the top of the Cynap screen. When the Cynap senses a device trying to connect, it will enlarge the pin code and move it to the center.
- Your Mac screen will appear on the Cynap screen.
- Connecting an iPhone or iPad to Cynap – instructions with screenshots
- Connecting an Android phone to Cynap – instructions with link to downloadable app
Using Annotations and the Whiteboard on Cynap
Annotate with Cynap
Tip: While annotations are possible on Cynap, it might be easier if you are using PowerPoint to use the annotation feature within PowerPoint or even to edit your PowerPoint slide and add type-written notes as you teach. The screens for Cynap work great for simple phrases, circles, and arrows, but not as well for complex annotations such as math equations.
Note: the video to the left is a supplement to these instructions.
- To annotate on a resource using Cynap, use the toolbar on the resource to send it to the main projector.
- This will maximize the resource on the Cynap screen, allowing for easier annotation.
- Tap the ellipses menu to open the toolbar.
- Select Annotation from quick tools to open the annotation menu.
- The annotation tools include pens and shapes, line width and opacity controls, color options, and edit tools (which allow the user to take screenshots throughout the presentation), as well as collaboration features.
- To allow students to annotate, instructors must enable Collaboration using the toggle and provide the PIN code, which regenerates each time.
- It is recommended to organize groups or teams before enabling access.
- Students should open a browser on their device and enter the Cynap IP address, create a username, and enter the PIN code.
- Students can then annotate on the shared content.
- Instructors can manage access by toggling each group on or off.
- To end the presentation, tap the X at the bottom of the Cynap screen.
- You will be prompted to clear all and end the session, or you can save a snapshot to a local drive, which can then be uploaded to the cloud or saved to a USB device.
Activating the Cynap Whiteboard and Annotating the Whiteboard
Note: the video to the left is a supplement to these instructions.
- Cynap Whiteboard Tools Overview
- Welcome to the Cynap whiteboard tools overview. The tools appear at the bottom of the screen.
- In the shapes menu, you will see common shapes such as rectangles, squares, circles, ellipses, pentagons, and triangles. There is also a freeform tool that allows you to draw more complex shapes. When using the triangle tool, note that it cannot create a right triangle.
- The mask feature allows you to hide part of your screen while teaching. This feature floats above other objects and can be moved anywhere. If you need to create more complex shapes, such as a right triangle, you can combine the freeform tool with other shape tools.
- Each object includes a menu that allows you to adjust its color, opacity, and, in many cases, texture.
- In the pen menu, you can select multiple objects. This allows you to delete several objects at once or select and delete them individually.
- In the media menu, there is a text tool for typing. You can adjust the font size and color, and apply formatting such as bold or italics. Text can also be moved around the page as needed. There is also a basic table tool, which allows you to adjust font size, formatting, background color, and overall size.
- The mind map tool helps you visually organize and develop ideas and information. Like other objects in the Cynap whiteboard, it allows you to adjust font size, apply bold or italics, and change colors.
- You can use the pen tool to annotate your mind map or other objects. The pen tool allows you to adjust the line size as needed. If you make a mistake, you can use the eraser tool, which also has adjustable sizes for more precise editing. A highlighter tool is also available.
- Be sure to adjust colors as needed, especially when using the mind map tool, to improve clarity for your students.
- Thank you for using the Cynap whiteboard tools.
Using Microsoft Office and OneDrive
Using Microsoft 365 with Cynap
Note: the video to the left is a supplement to these instructions.
- It is recommended to back up files from your device to the cloud in case you experience issues accessing files on your laptop.
- Microsoft 365 allows users to access Microsoft Office applications from the cloud and back up files using the OneDrive app.
- Additionally, Microsoft 365 enables instructors and students to share and collaborate.
- To access Office 365 using Cynap, tap the plus sign icon to open the Cynap menu, then select Microsoft 365.
- The Office 365 application icons will appear.
- Select the program you want to use.
- After selecting an application, you will be prompted to sign in to Microsoft.
- You will also need to complete two-factor authentication using your user credentials.
- Make sure to log out of Microsoft 365 before tapping the X to close the Office 365 resource on Cynap.
Note: By running the PowerPoint directly from Microsoft 365, you will not have presenter view or access to presenter notes. However, embedded videos and audio will work.
Cynap OneDrive
Note: the video to the left is a supplement to these instructions.
- Tap anywhere on the Cynap desktop to display the plus sign icon.
- Select the Files icon.
- Select OneDrive.
- Log in using your @utk.edu email address.
- Enter your password.
- Complete two-factor authentication using your phone or token.
- Select the folder, then choose the file you want to present.
- Use the keyboard arrow keys to advance through the slides.
- Note: Presenter view is not used. The display will be mirrored on the audience screen.
- Tap the menu at the bottom of the screen, then tap X to close the window.
Note: Cynap allows you to show a PowerPoint either from a USB drive or by launching a PowerPoint saved to OneDrive. We recommend running a PowerPoint that is saved to OneDrive. A PowerPoint launched from a USB stick will only show the slides; it will not play any embedded media or allow you to go to links, while a PowerPoint launched from OneDrive will play embedded media.
Using Cynap Tools: Menus, Web Browser and Cynap Inputs
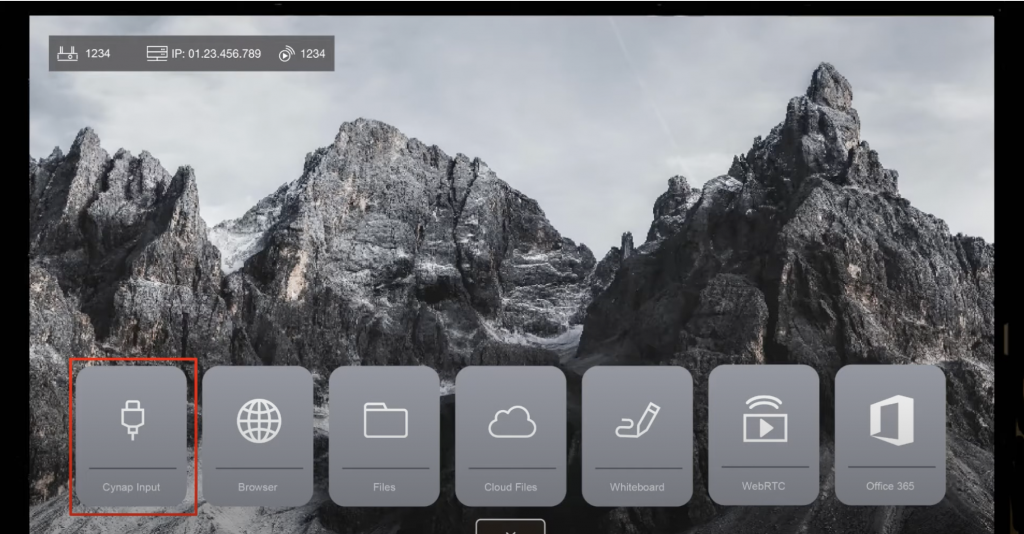
Plus and Ellipses menu:
Most of your menus for Cynap will be under wither the + or the ellipsis menu. The + menu has all the apps and the ellipsis menu will allow you to end the session (which is the same as a soft reboot of the Cynap).
Activating the Plus Menu and Ellipses Menu in Cynap
Note: the video to the left is a supplement to these instructions.
- To activate the Cynap menu and options, tap the screen.
- A plus sign icon will appear.
- Tap the plus sign icon to select resources to project on the screen.
- Tap the ellipses menu to access quick tools, recording options, volume adjustment, settings, and the option to end the presentation.
Using a Web Browser on Cynap
Note: the video to the left is a supplement to these instructions.
- Tap the Desktop to Get the [+] Sign
- Choose the Web Browser icon
- Tap the web browser window to bring up the menu at the bottom of the screen
- Tap the menu at the bottom of the window to see the URL address line
- Enter in the address you wish to go to and tap the return button to go to the web page
Cynap Inputs:
Cynap Input is the menu you select when you want to use a device that is wired into the system. This could be a laptop plugged in with USB-C or your document camera.
Activating Cynap with One Cynap Input
Note: the video to the left is a supplement to these instructions.
- To activate the Cynap menu and options, tap the screen.
- A plus sign icon will appear.
- Tap the plus sign icon to select resources to project on the screen.
- Select Cynap input to display the device you chose on your control panel under the Cynap input menu.
- You can have up to four sources displayed on the Cynap screen at one time.
- In addition to a wired connection, such as a laptop, document camera, or Blu-ray player, you can also add the onboard web browser, whiteboard, Office 365, or connect your laptop or smartphone wirelessly to Cynap.
- A login is required when using cloud files and Office 365.
End and Start a New Presentation in Cynap
Note: the video to the left is a supplement to these instructions.
- To end a Cynap session or start a new session, select the ellipses menu at the bottom right of the Cynap screen.
- Tap End Presentation under the Manage menu.
- This will display options to close all windows, clear annotations and snapshots, and log out.
- You can then start a new Cynap session.
- It is recommended to end the current presentation and start a new one before beginning a new Cynap session.
Mirroring Cynap:
The mirror option allows you to show the same image on the instructor monitor as you see on the screen. This can make choosing sound in a Zoom/Teams meeting easier. See the Mirror Mode On or Off page for instructions and detailed information on when you may want to change Mirror Mode.